NFC with a microbit
Near Field Communication, or NFC, has been around for many years. It's a rather interesting technology, as it is very short range - just a few cm - and RFID tags don't need a power supply! The tags have a non-volatile memory - typically 1k bytes. These have uses ranging from pet "chipping" to tracking items in a factory or warehouse.
We can get an NFC Reader at quite a low cost, around £6 at the time of writing. Most hobbyist articles on NFC use an Arduino or Raspberry Pi as the programmable controller for the project, but as the microbit is very popular, especially in schools, it seems worthwhile to show how it can be used.
Hardware
I used an NFC board (the NFC Module V3 from www.elechouse.com) which is based on NXP's PN532 IC. It integrates all the required components, including the coil. The board is supplied with pretty much everything you need, including two RFID tags, so that you can try reading and writing to them.
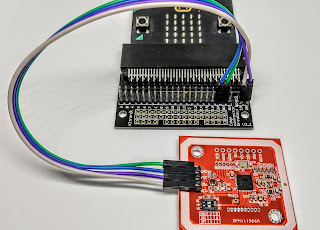
Here's the board connected to a microbit:
 |
| NFC board with a microbit |
The board has several interfaces: I2C, SPI, and HSU. I am using I2C because I have also added an OLED display which is I2C-based.
The first thing to do with the board is to set two DIP switches to the I2C mode, as shown in the photo:
 |
| DIP switch and I2C connector |
Then you need to solder a 4-pin header (supplied with the kit) to the I2C pins next to the DIP switch.
Now you can connect the I2C and power supply wires to your microbit. Here is the circuit diagram:
 |
| Circuit diagram |
Software
Fortunately there is a very useful MakeCode extension available for the microbit: pxt-NFCI2C. You add this to MakeCode by clicking on Extensions in the "library" drawer, then pasting this URL of its Github repository:
https://github.com/DFRobot/pxt-NFCI2C
in the Search window.
The NFC extension will appear in the drawer.
The file test.ts in that repository contains a number of test routines that you can try out. For example, to detect a tag (also known as a card):
basic.forever(function () {
if (NFC.checkCard()) {
basic.showIcon(IconNames.Yes)
} else {
basic.showIcon(IconNames.No)
}
})
Note that this code is in Javascript - you can copy and paste this into MakeCode if you set the Blocks setting to Javascript.
Display
I used a small (24 mm) OLED device from GeeekPi via Amazon. It can display 8 rows of text - curiously the top two are yellow and the rest are blue. A datasheet is available.
You wire it using the same microbit I2C and supply pins as the NFC board:
 |
| NFC and OLED display |
There is a MakeCode extension, oled-ssd1306, from Tinkercademy. This has basic show string and clear display routines, as well as some basic line graphics.
To demo the functions I wrote 2 routines, selected by pressing buttons A or B, to:
- Detect a tag when it enters the field
- Write 3 bytes with random numbers and then read them back.
My demo software is on Github.


Comments
Post a Comment