Posts

Showing posts from June, 2020

Weather Station 1

Image
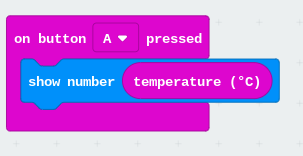
In this project, we will use a micro:bit to measure a number of useful things, starting with temperature. A micro:bit can measure temperature all on its own - try it! It’s not very accurate - it might have an error of 4C. Can we do anything about that? Make measurements over one day Now we will write code to make temperature measurements, and save them every 15 minutes for a whole day. You can take the micro:bit anywhere to measure the temperature - but keep it dry! We will read the measurements the next day, at about the same time. We could use them to plot a graph perhaps. Our code will need a list to put the temperature readings in. We give it a name - templist . A list is like a table:   count  temperature  0  21  1  21  2  22      95  25 Here is some code which saves the temperature to the list: Let’s start coding! In your Chrome browser, open the MakeCode website ( makecode.microbit.org ) and pair the micro:bit by clicking on the gear wheel, then Pair device . Here is the cod

Spirit level

Image
In this project, we will use a micro:bit to measure tilt - like a spirit level does with its bubble: The micro:bit has a built-in accelerometer (just like a phone). This measures tilt, in any direction. Code Try this code to see what happens when you download to a real micro:bit: Credit: micromag The code first records the acceleration in the reading variable.  Next we see how big reading is - when it is a small number (between -20 and +20) then we display “-”.  Here are some photos - tilting right, and then level: Tilting right Level Options Try seeing how much tilt you need to get the display showing tilted (“L” or “R”). Could you make it more accurate? Use the accelerometer to measure vibration. Leave the microbit on a flat surface - it will display acceleration every 2 seconds. Here is the code:

Radio radio

Image
Simple radio sender and receiver Micro:bits have a built-in radio, which is just like Bluetooth. The radio can send messages to, and receive messages from, another micro:bit, up to 70m away! I couldn’t get mine to work at that distance, but I was inside my house. Here is some simple code you can run on one micro:bit, the sender .  The first block is an arrow to remind you to press button A! Here is the main code block. First of all, the code sets the radio transmit (or sending) power to 7, which is full power. Then it sets up a radio group. Both radios must be in the same group. I chose group 1. Next, we have a loop which repeats forever (while true). Inside that loop is another kind of loop - it runs 10 times and tells the radio to send the variable called index , and it changes index from 0 to 9 in steps. So on the other micro:bit, the receiver, we expect to get the numbers 0, 1, 2 and so on up to 9, then repeat forever. We can use this code on the receiver micro:bit to display the

Arcade game

Image
Electronic Arcade Games became popular in the 1970s - your parents and grandparents may have played one of the earliest ones called Space Invaders. Here is a video of it - it might seem rather funny now but in 1978 it really was good! You, the defender , move along the bottom of the screen. You can fire missiles to an alien that moves along the top of the screen. The alien is dropping bombs on you. If you hit the alien then you score points , and if you get hit by a bomb you lose a life ! You know that the display on the microbit is quite small - there are only 5 LEDs across and 5 LEDs down - but we can still make quite a good game. This project will show you how to build up the game. There are some challenges for you too - can you add sound effects and scoring? The alien We will start by coding the alien. It is going to move across the top of the screen and back. Make a new project on https://makecode.microbit.org/ then add these code blocks: The green blocks use a new library w

A compass project for the micro:bit

Image
A Compass project for the micro:bit In this project, we use a micro:bit and Makecode (https://makecode.microbit.org/)  to measure compass “bearing” or angle - like a magnetic compass does. We usually think of North as 0 degrees and go round clockwise. There are 360 degrees in a circle.  East is a quarter of the way around the circle, so East is 90 degrees (because 360 ÷ 4 = 90), South is 180 degrees, and West is 270 degrees. Calibration The micro:bit has a built-in compass and it needs to be calibrated (or “adjusted” in other words) before it is used.  When you run the code the screen will display “TILT TO FILL SCREEN”, and you will see some dots on the screen, like this: Calibration step When you have filled the screen by doing the tilting, you will get a smiley face, and your own code will run. Code Here’s the code to show a dot on the screen at N, NE, E, SE, S, SW, W and NW (that’s every 45 degrees) and so on, depending on which direction your micro:bit is pointing. You can change t