Posts

NFC with a microbit

Image
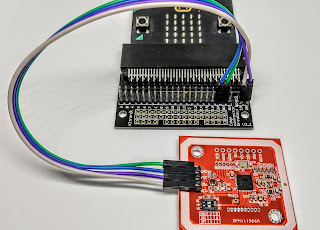
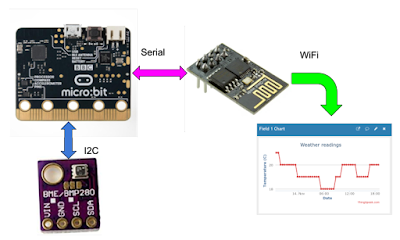
 Near Field Communication, or NFC, has been around for many years. It's a rather interesting technology, as it is very short range - just a few cm - and RFID tags don't need a power supply! The tags have a non-volatile memory - typically 1k bytes. These have uses ranging from pet "chipping" to tracking items in a factory or warehouse. We can get an NFC Reader at quite a low cost, around £6 at the time of writing. Most hobbyist articles on NFC use an Arduino or Raspberry Pi as the programmable controller for the project, but as the microbit is very popular, especially in schools, it seems worthwhile to show how it can be used. Hardware I used an NFC board (the NFC Module V3 from www.elechouse.com ) which is based on NXP's PN532 IC. It integrates all the required components, including the coil. The board is supplied with pretty much everything you need, including two RFID tags, so that you can try reading and writing to them. Here's the board connected to a mic

Air Quality Monitor

Image
Sensing air quality by measuring  the concentration of 2.5 μm particulates is a useful and fun thing to do. This project displays the measurement on a microbit, and it will be developed to also use a small LCD module. This is slightly more advanced than my usual microbit projects - it uses JavaScript rather than blocks, and involves some fiddly soldering. The inspiration comes from some fascinating internet chat and articles on how to adapt a low-cost Ikea monitor, the  Vindriktning . This cost £15 at the time of writing, which seems affordable for a school project. The device is a stand-alone small box, that has a simple LED indication to show green (good), yellow (ok), and red (not good). It's powered from a USB-C lead. The website for  Home Assistant  (free software for home automation) has a useful series of posts  on Vindriktning  here . These have focussed on adding a small device to log the air quality measurements. They have generally used an ESP8266 microcontroller which i

Low-cost solar power source for microbits

Image
  Solar panel, microbit, battery and regulator Update I have made a few improvements since this post was published in September 2022: The key change is to use a   separate low-dropout regulator (LDO) to provide the 3.3V supply to the microbit and other components. I had previously used the microbit's internal regulator. I found subsequently that it has a curious high-current region as the battery voltage drops, which leads to a period of rapid battery discharge.  AA rechargeable cells, with 1200 mAh capacity, replace the previous AAA 850 mAh cells I use a 2W solar panel and a smaller current limit resistor, so that I can get a higher charging current I added a PNP transistor to the output of the TL431 shunt, so that it can handle more than 100 mA These changes do add a little to the overall cost, but they do give more reliable operation under a wide range of solar input. Introduction This article describes a low-cost DIY solar power source which is aimed at school projects such

Microbit WiFi weather station

Image
Introduction  This is a microbit project aimed at junior schools. It allows you to:  make regular readings of things you can measure electronically (such as  air pressure  and  temperature ) upload  those readings automatically via WiFi to a free  web service  ( ThingSpeak ) where you can store readings, and display the readings as a chart, for example It features: low current consumption (typically 2.2 mA average) easy set-up of your readings at ThingSpeak easy assembly of the parts  It evolved from some of my previous projects: a  Microbit weather station  for example, which used a pair of microbits to upload readings to a laptop or similar.  I've used a few good articles on the web to get this project running (see the Further reading section). The design is really quite simple and easy to use. No human intervention is required to upload the readings, and a Real Time Clock isn't needed as ThingSpeak records the date & time of each reading. Shopping list You will need th

Microbit with an external ADC

Image
Update 4 Sept 2022: I found that the ADS1115 code below works fine when you are reading one channel. But when you are reading more than one channel (i.e. switching from one to the other) you can easily get a wrong reading. The reason behind this is described on a TI forum here . Briefly, you need to have a delay between setting the ADC channel and reading the conversion result. I have written an unpublished MakeCode extension which adds simple blocks and handles this delay. It can be used by pasting its Github location into the MakeCode Editor's "add extensions" search bar. Introduction This post shows how you can connect up a low-cost external ADC to a microbit using the I2C bus. The ADS1115 ADC has 4 channels and an on-chip voltage reference. Example code is provided for Micropython and MakeCode/JavaScript. Background The microbit includes an ADC, but it has limited usefulness for measuring voltages - particularly if you want to monitor the microbit's supply voltag