Microbit WiFi weather station
Introduction
This is a microbit project aimed at junior schools. It allows you to:
- make regular readings of things you can measure electronically (such as air pressure and temperature)
- upload those readings automatically via WiFi to a free web service (ThingSpeak) where you can store readings, and
- display the readings as a chart, for example
- low current consumption (typically 2.2 mA average)
- easy set-up of your readings at ThingSpeak
- easy assembly of the parts
I've used a few good articles on the web to get this project running (see the Further reading section).
The design is really quite simple and easy to use. No human intervention is required to upload the readings, and a Real Time Clock isn't needed as ThingSpeak records the date & time of each reading.
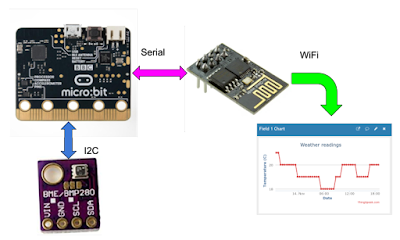 The microbit periodically reads the sensor's measurements, then it starts up the ESP-01. The code connects the ESP-01 to your local WiFi, then connects to ThingSpeak and uploads the measurements. Finally the ESP-01 is powered down, and the cycle repeats.


Next comes the WiFi connection - add the microbit pins and your WiFi details (but don't share them!):

Notice that I'm using the code to plot or unplot some status LEDs on the microbit display. This is useful when you are testing the code. The ESP-01 has a couple of its own status LEDs too.

Here's an example set of readings for one day:
Shopping list
You will need the following:
- a microbit - either version will work.
- a BME280 sensor board - other I2C sensors could be used.
- an Espressif ESP8266 ESP-01 - this handles the WiFi.
- a breakout board for the microbit - I used the Kitronik Breakout Board for microbit.
- jumper wires - I used 10 cm duPont wires with female connectors at each end. These mate with pins on the various boards.
- a board or similar to mount everything on
- a 3.3V power supply, capable of delivering a few hundred mA - I used an AMS1117 module from Hobby Components. You could also use 3V from 2 cells in series.
- an account on ThingSpeak - this is free for non-commercial use, provided you limit the number of messages to 3 million per year (which should suit most people!)
Architecture

Circuit diagram
.png) |
| Schematic - Note: 3.3V supply is not shown |
The BME280 weather sensor links to the microbit with the I2C bus. This has just 4 wires: 3.3V, 0V, SDA and SCL.
The ESP-01 uses the microbit's serial interface to send and receive WiFi commands and data (but we have to use specific microbit pins for this, not the USB). In the code you can define which of the microbit pins are used. The ESP-01 also needs power via the 3.3V and 0V wires. Because we will typically only want to switch on the ESP-01 intermittently, to reduce power consumption, I have used another microbit pin (P2) to enable (i.e. power-up) the ESP-01.
I used an AMS1117 regulator to supply 3.3V at high current to all components. This module can have a wide range of input voltage (4 to 12V - I used 5V from a USB charger cable).
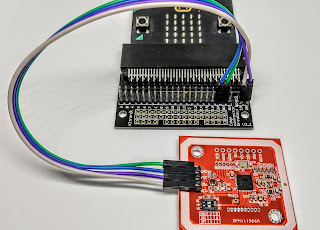
Assembly
All the modules I used have standard 0.1 inch pitch pins, which makes it easy to assemble them on a mother board.

Microbit code
A couple of MakeCode extensions are used:
- BME280
- ESP8266_ThingSpeak
The main code is just a loop which runs every 30 minutes (you can change this of course). The on start block sets up the initial state of P2 (which is used to power up the ESP-01) and also sets the variable sampleTime:
The loop starts by enabling the ESP-01 then powering up the BME280 sensor:
Next comes the WiFi connection - add the microbit pins and your WiFi details (but don't share them!):

Then, if the WiFi is connected, we upload the readings to ThingSpeak. You will need the API key (given to you at sign-up):

Also, I send a reading of the microbit's running time - again, it's useful when you are testing.
The last section of the sampling loop powers down the ESP-01:
ThingSpeak
Setting up Thingspeak is quite straightforward - please see the first two links below.
Once you have an account you just need to create a "channel"; this will be used to display your readings.
 |
| ThingSpeak channel |
Here's an example set of readings for one day:
 |
| Charts for the Weather readings channel |
Further reading and ideas
My next idea - use a Google sheet as a web app. This will avoid using a 3rd party web service. Some more complex coding is required!


Comments
Post a Comment