Real Time Clock
Here are a few reasons why you might want "real" time on a microbit:
- if you are recording measurements (data logging) you probably want to record the time you made them - this is known as a timestamp.
- if you are automating something, such as a security light, you might need to do things at a particular time.
The microbit can measure elapsed time, which can be useful, but you need to know the date and time when you started the timer.
You can use the data logging feature in MakeCode but that (at the moment) doesn't make a timestamp, and your microbit would have to be connected to a computer running MakeCode.
I want to run data logging without connecting to a computer, so that the microbit is a self-contained module. So adding a small Real Time Clock module solves the problem. I can upload measurements, with their timestamps, from the microbit, once a day or once a week, for example.
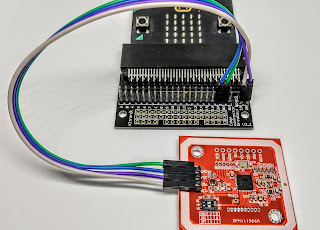
This project uses the Tiny RTC module which is really small (23 x 27 mm)! It includes a small battery too, so you won't have to set up the time if the microbit's power gets disconnected.
A word of caution though: the battery voltage shouldn't be too high, otherwise the clock's registers may not work properly. If you see this problem, either remove the RTC's battery or discharge it a bit.
You can find some useful information on the Tiny RTC module here.
Connecting the Tiny RTC to the microbit
The microbit communicates with the RTC module using the I2C (inter-integrated circuit) protocol. This uses 2 wires for data (SDA and SCL) and two for power (VCC and GND). We need to connect them as follows:
GND to GND
VCC on RTC to 3V on microbit
SDA to SDA (pin 20 on microbit)
SCL to SCL (pin 19 on microbit)
I soldered a set of header pins to the RTC so that I can make the connections to the microbit's breakout board using jumper wires.
 |
| Header strip, before soldering |
 |
| Connections |
Testing the RTC
There is a set of MakeCode blocks for the DS1307, the chip that is used in the RTC. In MakeCode, click on Advanced and then scroll down to Extensions. Search for DS1307 and click on this icon:
 |
| MakeCode extensions for DS1307 |
The first thing to do is start the RTC, then set the date and time. I used 2 blocks of code:
- the RTC start command goes in the on start block
- then, when button A pressed, we have a sequence of RTC set commands that set the date and time:

Finally, we have some code to send the timestamp to a computer over USB.
First, the date variable is assembled by joining the day, month and year readings, separated by "/" characters.
In a similar way we assemble the time variable, and then dateTime is assembled by joining date and time with a space character in between.
Finally, we send dateTime to the USB port:

This is the result I get using Beagle Term (an Android app) to display the microbit USB output:
 |
| Microbit output |
Making a temperature logger
To show how we can add a timestamp to measurements, here is some code that uses the microbit's built-in temperature sensor. We can re-use the button A pressed code for setting the time.
Then we have new blocks which:
- make a regular temperature measurement and then assemble dateTime. These are joined together and added to temperatureList, which is an array type of variable.
- send our readings over USB when we want to save them on a computer.
Our on start block now has new code blocks which make sure that the temperatureList array is empty and then set a variable called waitTime which defines how long to wait between measurements - I have used 15 minutes.

The main loop is a forever block which:
- generates dateTime as before,
- makes a temperature measurement and joins it to the temperature measurement into a variable called listItem, with a comma between them,
- then adds this to the end of the temperatureList

The last block sends all of our readings over USB:

Typical output looks like this on Beagle Terminal - the date and time followed by the temperature:
 |
| Microbit output |
Here's a chart of temperature measured every 15 minutes for a few hours:
 |
| Chart |


Comments
Post a Comment