Microbit (V2) weather station
Microbit weather station mk2
This project builds on my experience (here) with a microbit. This version uses Bluetooth Low Energy (BLE) to upload readings to a device, such as a phone - this is a much more convenient upload method than USB.
I have also had reliability problems with the DHT11 temperature and humidity sensor. It seems this isn't uncommon! So I am using the BME280 device to measure all 3 parameters: air pressure, temperature and humidity. This device has rather good accuracy: ±1.25℃ (temperature), ±3% (humidity), and ± 1 mbar (pressure).
❗At the moment the MakeCode extension for the BME280 only returns integers for the readings. The author is planning to update it so please check back here for blog updates!
The weather station lets you make regular hourly readings of weather measurements, store them together with the date and time, and upload them to a device. You can use the readings to plot a chart, for example, to show how the weather changed over time. Here's a set of readings over 3 days:

These are the measurements I am using for this project:
- Barometric air pressure
- Temperature
- Humidity
You can add more "instruments" - for example, I plan to add a home-made rain gauge, as described in this blog.
The weather station can be self-contained, powered from a couple of batteries perhaps.
The Bluetooth link
You will need to pair your microbit and device before using them. Here is a set of instructions for doing the pairing for an Android device.
The microbit's bluetooth uart service can send messages to (and also receive messages from) a paired device, but the message's length is limited to 20 characters. So we need to be careful! I found it convenient to send the date and time as one message, and the pressure, temperature and humidity readings in a separate message.
For example the date and time looks like this:
16/01/2021 16:18,
16/01/2021 16:18,
16/01/2021 16:18,
and the weather measurements like this:
1003,21,44
Notice the "," after the date/time text string, and also between the weather readings. This allows us to import the 2 messages into a spreadsheet which will then separate the readings into separate columns. You can then generate a chart quite easily.
Controlling the weather station
For convenience my design displays the temperature whenever you press the microbit's button A.
There are 3 other controls:
- Upload the stored readings: simply connect your Bluetooth terminal - no button press required!
- Delete the previously stored readings: press the microbit's button B
- Reset the RTC's date/time: press the microbit's button A and B together. (This does require you to change the date/time in the code and download it to the microbit.)
The I2C bus
The BME280 sensor is going to be outside the house (because I'm measuring outside temperature and humidity). This means the I2C 4-wire cable is a few metres long - in my case, it's about 3m. If you use a much longer wire you may need to reduce the I2C pullup resistors, because of the increased capacitance.
This document explains how to calculate the pull-up resistor for the two I2C signals.
The hardware
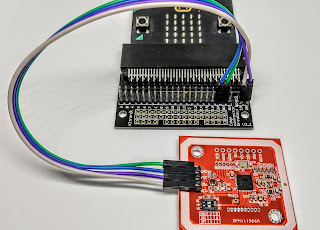
The measurements use a number of small boards which are connected to the microbit:
- A DS3231 Real Time Clock board keeps track of the date and time (including a battery backup). It also has an alarm function which tells the microbit when to make its readings.
- A BME280 board measures air pressure, temperature and humidity.
These boards are connected to the microbit using its I2C bus, which has separate data and clock signals on the (fixed) SDA and SCL pins.
Schematic

Assembling the boards
I've connected the boards to the microbit using a Kitronik CREATE Proto board. The assembly looks like this:

 |
| Rear view, showing the DS3231 board and cable to the BME280 |
 |
| Wiring on reverse side |
 |
| BME280 in its protective box |
The code
A lot of the code consists of functions - this makes it easier to debug if things go wrong, and it's also easier to describe each block.
Two extensions are used; these are loaded into the MakeCode editor via the Advanced > Extensions > Search menus, and then choosing these:

The code for the project is available on github.
The on start block creates empty arrays for:
- date/time readings
- weather readings, ie the air pressure, temperature and humidity
 |
| on start block |
It also sets up a variable for a limit to the number of readings (readingsMax), the alarm time and flags, and the Bluetooth service ("uart") that sends out the readings.
✦✧✦✧✦✧✦✧✦✧✦✧✦
The forever block polls the P0 pin - which is set to 0 when the alarm is triggered - every 10 seconds. When P0 is at 0 the code gets the reading from the BME280 device and stores it in the weatherReadings array. The reading is a text string and each measurement is separated from the following one by a comma.
This is a common format called comma-separated variables, or CSV for short. It's easy to import CSV files into a spreadsheet, which you can then use to create a chart.
The code also briefly displays the number of readings in the arrays on the microbit's screen. That's useful for making sure that the code is running as expected!
 |
| forever block Note that when we test that the time matches the alarm time, we have to test bit 0 of the DS3231 status register. This is done by "masking out" all other bits by looking at the remainder of the status value after dividing by 2. I got caught out when I found a DS3231 whose oscillator had stopped briefly. This results in bit 7 of the status register being set. |
✦✧✦✧✦✧✦✧✦✧✦✧✦
The functions that we use to build the output arrays are described next.
 |
| dateTimeString function |
This gets some date and time values from the DS3231 RTC board, and inserts conventional symbols between them, ending with a comma. In turn, it "calls" another function leadingZero:
 |
| leadingZero function |
The getReadings function accesses the BME280 board, power it on, and inserts commas between the 3 measurements:
 |
| getReadings function |
The upload function loops through all the readings and sends the 2 messages as a single line of text. If there are no stored readings then an error message is sent instead. Icons are displayed on the screen to show the upload start and end:
 |
| upload function |
The setTime function sets the date and time to whatever is programmed in this block:
 |
| setTime function |
The on bluetooth connected function sets a flag (the connected variable) to tell the upload function that the microbit's Bluetooth is connected. A large square appears briefly on the display too.

The on bluetooth disconnected function resets the connected variable and shows a small square on the display.

Uploading your readings
I'm using the Serial Bluetooth Terminal (Android) app. This has a very convenient interface. After pairing your phone with the microbit using the MakeCode/Samsung app (see link), just find your microbit from the Terminal app using SCAN; you should then see it on the Devices list:
 |
| Select device |
In the app settings, turn off "timestamps"!
To upload, just connect to the microbit by pressing the circled button below:

Then save the data to a convenient location - either use the Data > Save menu to send it to your phone's Documents folder, or use the Data > Share menu to send it elsewhere:

BLE problems
The BLE (Bluetooth) on the microbit doesn't always work well. You may find the following useful.
- "Forget" the pairing - via the Bluetooth paired devices list on your phone etc. Then re-pair using the process for your device (e.g. the microbit app for Android).
- Restart the BLE app
- As a last resort, reset the microbit - you will lose any stored readings though.
Making a chart
I use Google Sheets with a script to:
- import the CSV file which was uploaded from the microbit, and append it to the existing data in the spreadsheet.
- draw a chart - with a free options for the range of dates.
The script creates a special Chart menu (see below):
 |
| Chart menu |
The script is in Github.


Comments
Post a Comment